Wednesday, August 31, 2011

Five Reasons to Try a Gluten-Free Diet

Over the last several years, Healthy Home Market has really focused on building up our gluten-free selection. And we are proud at the quantity and variety of products that we are now able to offer our customers, with more products becoming available regularly. 1 in 133 people are now said to suffer from Celiac Disease, or gluten intolerance, though some 97% are said to be undiagnosed. Many people also rely on a gluten-free diet to help with Autism and ADHD. It was our interest in gluten-free diets that led us to our partnership with Parker Autism. But there are many reasons to try a gluten-free diet even if you don't suffer from any of these conditions (that you know of). Here are five good reasons to give a gluten-free diet a shot, even if just for a month.

1. Cure Fatigue - A diet free of gluten has been proven to relieve the symptoms associated with fatigue and give you more energy. Many alternative health practitioners believe that wheat can create an imbalance in the minerals of the body which can create a deficiency of magnesium that results in tiredness.

2. Increase Whole Foods Intake - By following a gluten-free diet, you will naturally cut down on processed foods, which often contain bleaches, preservatives, conditioners and additives. In place, there will be lots of room for fresh, whole foods in your daily diet. There is a higher concentration of vitamins, minerals and phytonutrients found in whole foods.

3. Ease Depression - Depression can be triggered by wheat intolerance. Mark Hyman, MD of the UltraWellness Center in Lenox, Massachusetts, said this to Elle Magazine:
"The culprit and cure for most psychiatric disorders lies in the gut," Hyman says. "Allergies and toxins in food, the environment, and drugs damage it, causing it to become inflamed and to “leak,” allowing undigested food and bacteria to slip into our bloodstreams. This leads to autoimmune disorders, malnutrition, and brain damage."

4. Weight Loss - A diet without gluten is very low in carbohydrates. Some of the ingredients found in gluten-free foods have no refined carbs. That means that it is easier to lose weight, lower cholesterol, lower blood sugar, curb cravings and gain energy.

5. Eases Numerous Afflictions - Many diseases and conditions are helped by following a gluten-free diet. Celiac disease, dermatitis herpetiformis, rheumatoid arthritis, joint pain, loss of balance, memory loss, and many other ailments can benefit from this diet.

Sources: thecravingscoach.com, planetgreen.com

Monday, August 29, 2011

Meatless Monday: Tex Mex Stuffed Potato Skins

Ingredients

12 small potatoes, baked and halved, meat scooped out
1-2 tablespoon olive oil, divided
2 garlic cloves, minced
1/2 cup chopped red pepper
1/2 cup chopped onion
salt and pepper
15 ounces pinto beans
1/2 cup hot salsa or 1/2 cup mild salsa, your choice
1/2 teaspoon ground cumin (optional)
1 chipotle chile in adobo (optional)
1 cup shredded cheese

Directions

1. Preheat oven to 400°F.
2. Sauté garlic, red peppers, and onions in 1 teaspoon olive oil 3 minutes.
3. Place potato skins in a bag with remaining oil, salt and pepper and lightly toss to coat with oil.
4. Puree salsa and beans in a blender with cumin and chipotle pepper.
5. Place skins on a parchment or silicone pad.
6. Fill with bean mixture, top with onion mixture, then with cheese.
7. Bake for 15-20 minutes till bubbly and browned.

Thursday, August 25, 2011

South End Mural Ribbon Cutting, This Saturday!

A month and a half ago, work began on a mural on the side of our South End location and now it is complete! We couldn't be happier with the result! A huge thank you goes out to the children from Parker Autism's Camp Dakota, St. Patrick's Boy Scout Troop 9 and all of the other children and adults from the community and employees who contributed to what has been named "Charlotte's Road to a Healthy Home." We are excited to officially cut the ribbon on the finished piece of art and we would like to invite everyone out this Saturday to celebrate the completion! As the theme behind the mural is eating and supporting local, we will have local vendors here offering free food samples, including KW Collards, Bushelle Seasonings, Sadie's Caribbean Fish Cakes, Villa Antonio, Roots Hummus, and Penny's Pimento Cheese. Plus, Olde Mecklenburg Brewery will be here conducting a free beer tasting and everyone will get a slice of local watermelon! Greenfield Farms has generously donated their local, grass-fed beef for us to grill out and we will be offering burger (veggies burgers will be available) plates with natural chips and natural sodas, for only $4.99. $2.49 of every plate sold will be donated to the Parker Autism Foundation. We will have face painting and free balloons for the kids! Plus, Charlotte Energy Solutions will be here with Segways and foldable bikes for everyone to try. And what celebration would be complete without live music? Chris Kollman will be here setting the mood. While you're here, enter our "Name That Pig" contest. The winner will receive a gift basket worth $200! See you all Saturday!

Monday, August 22, 2011

And Galleria Makes Five!

Healthy Home Market is very proud to announce that we are currently hard at work preparing to open our fifth location! Our new store will be located in the Galleria Shopping Center off of Sardis Rd. N., next to Party City. This new location will carry on the tradition of our other stores in providing natural and organic products, supporting local companies and catering to special diets. There will be a focus on bulk products, including herbs and spices, supplements, health and beauty care and gluten free foods. The store will also feature a smoothie bar, with fresh coffee and tea, and carry grab-and-go salads, deli sides, sandwiches, raw food items, etc. Please "Like" our Galleria Facebook page to keep up to date on our progress and Grand Opening information. We hope you all are as excited as we are and we welcome any requests or suggestions!

Meatless Monday: Paneer Manchurian

Ingredients

For the Manchurian base:
1 block of paneer (or tofu), cubed
1 diced chili pepper
1 diced spring onion
1 tsp Soy sauce
2 tsp tomato sauce
2 tsp chopped ginger
2 tsp chopped garlic
1/4 tsp chili sauce
1/4 tsp pepper powder
1 to 2 tsp cornflour
2 tsp oil
1 tbsp water

For the Paneer Marinade:
1 tsp ginger garlic paste or finely chopped ginger-garlic
1/4 tsp pepper powder
1/4 tsp crushed red chillies or red chili powder
Salt to taste
2 tbsp cornflour

Directions

Method for the Manchurian base recipe:
In a pan or wok, heat oil. When the oil becomes hot add the onions. Stir fry the onions on medium to high heat taking care that they do not get burnt. If they heat is too much, then lower the heat and stir fry.
Stir fry for 2-3 mins. Now add the capsicum. Stir fry the capsicum also for 2-3 mins. Add the chopped ginger-garlic. Stir fry for a minute. Now add all the sauces and pepper powder.

For the Dry Paneer Manchurian Recipe:
If you want the paneer manchurian recipe to be to be dry, then do not add any water. Just add the sauces and pepper powder. Stir well. Add the fried paneer pieces. Mix the paneer pieces with the veggies and serve the dry paneer manchurian hot.

For the Paneer Manchurian Gravy Recipe:
For the gravy, you can use 1 tbsp water as I did not want much gravy. If you want more gravy, you could add 1 tbsp or more of water to the stir fried veggies.
Now, in a small bowl, make a paste of cornflour with little water. Add this cornflour paste to the veggies. Simmer for a 3-4 minutes as the cornflour has to cook. Add salt.
Now finally add the paneer pieces to the gravy. Garnish with chopped spring onions.
Serve with Chinese Veg Fried Rice. Paneer Manchurian also goes well with Indian Tandoor Rotis or Naans and even Homemade Indian Chapatis or Parathas. You could also have it with simple plain cooked rice.

Note:
Add the cornflour paste slowly and keep on stirring while adding it so that lumps are not formed.
If you like to have more gravy, you will obviously use more water. So in proportion you will have to increase the cornflour paste.
The cornflour is added to thicken the gravy. If the gravy becomes too thick, then you can thin it by adding little water.

Source: vegrecipesofindia.com

Monday, August 15, 2011

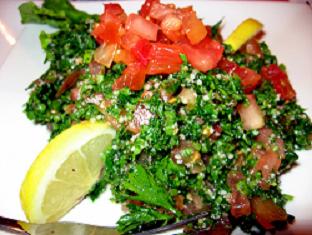
Meatless Monday: Tabouli

Ingredients

2 large tomatoes or 2 Cups Diced tomatoes
1 cup chopped green onion
4 cups finely chopped parsley flat leaf
1 cup yellow onion chopped
5-8 leaves fresh mint
1 or 2 cloves of garlic minced 
1/4 cup bulgar
1 tsp dry mint
1 tsp salt
1/2 Cup lemon juice
1/2 Cup Extra Virgin Olive Oil
1/2 tsp cayenne pepper

Directions

1. Rinse bulgar in a bowl and poor off excess water, let sit for 10 minutes.
2. Rinse and finely chop parsley and fresh mint leaves and place in a bowl. 3. Add chopped tomato, garlic, green onion, yellow onion, and soaked bulgar and combine with parsley.
4. In a separate small bowl combine salt, dry mint, lemon juice, olive oil and cayenne pepper then add to parsley mixture and let sit for 5 minutes before serving to allow bulgar to absorb some of the dressing.

Can be served in individual leaves of lettuce as an appetizer, as a side dish with pita bread, falafel, grape leaves, etc. or add in some additional ingredients to make it a meal!

Many people also enjoy cucumber in their tabouli. Be creative, try different summer veggies and experiment with adding in different types of grains. Add in chick peas or feta cheese for protein and you have a meal!

Adapted from dedemed.com

Monday, August 8, 2011

Meatless Monday: Raw Spaghetti with "Meatballs"

Ingredients

Noodles
1 large zucchini
Sauce
•1 tomato (or 2 plum or 4 Campari)
•1/2 red bell pepper
•1/2 cup sun dried tomatoes, soaked
•1 clove of garlic
•1-2 tablespoons of extra virgin, cold pressed olive oil
•1 teaspoon of dried oregano
•1 teaspoon of dried basil
•A dash of sea salt and pepper
"Meatballs"
•1/2 cup walnuts, soaked for 6 hours in water
•1 stalk celery, chopped
•1 slice onion, chopped
•1/4 red bell pepper, chopped
•1 clove of garlic, crushed
•1 tablespoon extra virgin, cold pressed olive oil
•Dash of oregano, basil, sea salt and pepper
•A squeeze of fresh lemon juice

Directions

Noodles
If you have a spiral slicer, use it to turn your large zucchini into long strands of angel hair pasta. Otherwise, use a julienne slicer or a simple cheese grater to make your noodles. Shred the entire zucchini.
Sauce
Soak the sun dried tomatoes in water for about 30 minutes before making your sauce. Then add all ingredients to your blender or food processor and puree until the sauce reaches the desired consistency. Blend for a shorter period of time for a chunky sauce
Meatballs
1. Start by soaking 1/2 cup of walnuts for 6-8 hours before making your spaghetti. Soaking walnuts makes them softer and easier to work with. You can substitute pecans, but most other nuts do not work as well for meatballs. Try to stick with walnuts or pecans.
2. Blend mixture in a food processor briefly. Scrape any mixture from the sides of the food processor and continue to pulse it until everything is blended.
3. What you want is a chunky mix of walnuts and veggies that clump together easily and can be formed into balls. If it is too chunky, they may not stick and fall apart too easily. If you over-blend, you’ll end up with a pate or mush that won’t hold it’s meatball shape. Be sure to stop occasionally while processing to check the consistency and test to see if you can roll it into a ball in your hand.

Source: incrediblesmoothies.com

Friday, August 5, 2011

DIY: Kombucha Tea

Kombucha is a fermented drink, that for centuries, has continuously helped keep the human body healthy and strong. The delicious and easy-to-make concoction is used as a detoxifying agent for the body and claims to increase energy, sharpen eyesight, aid in joint recovery, improve skin, aid in digestion, and even expedites cancer recovery.
If you’re looking for a fun and interesting way to improve your health for the summer season set aside some time to try a new do-it-yourself-project that will your friends thinking you are now a talented tea maker.

The Necessary Ingredients:
1 kombucha culture (this can bought online. The culture will restore itself with every batch you make, so it’s a one-time buy.)
2 litres of water
3 or 4 tea bags/teaspoons of loose tea (Black works best but green or white can be used)
160 grams of white sugar
2 tablespoons of cider vinegar

The Necessary Equipment:
1 three liter glass Pyrex bowl (or something close to 3 liters)
1 tea towel for covering the bowl (this can be found at a local tea shop or health food store)
1 rubber band to secure the tea towel
1 teapot
1 measuring cup
1 strainer
Some bottles for storing the finished drink (old glass bottles are fine)
PRE-STEP: Make sure everything is clean.
You’re dealing with a live culture of bacteria so you don’t want to mix it with any other substances that could be on your equipment from before.
STEP 1: Make your tea
Make a teapot of boiling water and leave the tea in for about 15-20 minutes. Take out the tea bags and add all the sugar, stirring until it dissolves. Add cold water to bring the tea up to 2 liters. Make sure you use cold water as hot water can kill the culture
STEP 2: Make your brew!
In the class bowl pour the 2 tablespoons of cider vinegar (you can also use 200 Ml of Kombucha.) Pour the cool tea into the bowl. Add the Kombucha culture. It will float or sink—this is not important. If one side is darker put that side facing down.
STEP 3: Fermenting time.
After the tea and culture are in the bowl, place the tea towel over the top and secure it with your rubber band. This keeps contamination and your drunken roommates who think it’s a bobbing for apples game from touching the mixture. Put the bowl in a warm place (70 degrees works best so if you have a radiator that’s perfect). Let it sit.
STEP 4: Taste Testing
The fermentation process typically takes 5-14 days depending on the temperature of the place in which you stored it. After 2-3 days you will notice a think layer of foam forming on the surface. This is the membrane of your new Kombucha culture (if you like science experiments, you’ll probably get a kick out of this). Start tasting the brew after 5 days. Just dip a spoon in and be careful not to disturb the culture too much. If you like it on sweet side, your batch will be ready typically in less then a week. If you like it sour it will take longer.
Step 5: Bottling
With clean hands lift the culture out and place it on a plate (you can immediately start making a second batch with this if you like). Strain your Kombucha into a jug and leave behind 200 Ml for your next batch. Fill your bottles and try it out. For best results, like brewing beer, it’s best to wait a month or so to let the sugar completely ferment. This will give the Kombucha a better taste and add more carbonation. The bottles of Kombucha will sometimes make little cultures within themselves. These are totally normal to drink and happen naturally. They tend to stay right at the top of the bottle so just take a spoon and remove them if you feel so inclined. Enjoy!


Source: Lauren Howland at planetgreen.com

Monday, August 1, 2011

Meatless Monday: Black Bean and Summer Veggie Enchiladas

Ingredients

1 1/2 teaspoons cumin
1/4 teaspoon hot chili powder
1/4 cup flour
1/4 cup tomato paste
14 oz. vegetable stock
1/2 teaspoon kosher salt
2 teaspoons canola oil
3/4 cup red pepper, small dice
1 cup zucchini, small dice
2 cups grated pepper jack cheese
1 cup grated sharp cheddar cheese
15 oz. black beans
3/4 cup corn kernels
3 scallions, thinly sliced
12 (6-inch)flour tortillas
Sour cream, for serving

Directions

1. To make the enchilada sauce, in a small saucepan, combine cumin, chili powder, flour, and tomato paste. Whisk to combine and cook for about 1 minute. Gradually whisk in stock, salt, and 3/4 cup water. Bring to a boil. Reduce heat and simmer for 3 - 5 minutes or until the sauce is slightly thickened. Remove from heat and set aside.
2. Heat a saute pan to medium high heat and add the canola oil. Add the red pepper and zucchini and saute for about 3 - 5 minutes. Remove from heat and place in a large bowl. Cool slightly. Add 1 cup of the pepper jack cheese, the cheddar cheese, black beans, corn, and scallions and stir to combine.
3. To assemble enchiladas, spray a 9 x 13 inch baking dish with cooking spray. Dip tortillas, one at a time, in the sauce. Place on a cutting board and fill with about 1/2 cup of the filling. Roll up tortilla and place seam side down in baking dish. Continue filling and rolling the remaining tortillas. Pour the sauce over the enchiladas and top with the remaining 1 cup of pepper jack cheese.
4. To bake, place uncovered dish in a preheated 400 degree oven for 15 - 20 minutes until the cheese is melted and the enchiladas are heated through. Remove from oven and serve with sour cream if desired.

Source: dinnerforayear.blogspot.com